Here is the third part of my Visual guide to Windows Live ID authentication in SharePoint 2010. This part takes off just where we ended the last part. If you haven’t read part 1 and part 2 then make sure to read them through before continuing.
Submitting site for compliance
In order to get your INT site into the PROD/production environment you need to make sure that your site follows the compliance rules. If you do not follow the rules then you will not be able to run your site using the “normal” Live ID accounts. The compliance criteria and verification cases can be found at the MSM site as Word or PDF format. Note that this document is dated way back in 2006 so some things are quite outdated. Here is a short but not complete summary of the compliance criteria:
- Must work with Internet Explorer 6.0 or later (don’t think this one is valid though, since I got my SharePoint 2010 site approved - aim for IE7+ support)
- A link to your Privacy statement must exist on the first page and this privacy statement must include a link to the Windows Live ID privacy statement
- All first-level pages must have a valid and functional Sign In text or valid Live ID Sign In button
- There must be a Sign Out link (or image) when logged in
- Windows Live ID must be correctly spelled and have the trademark symbol at first mention
If you are going to use images for the Sign In and Sign Out links - you must use the official ones. And you must have them point to the original location.
 http://www.passportimages.com/signin.gif
  http://www.passportimages.com/signout.gif
Once you believe that you meet the criteria’s it is time to submit it for approval. In the MSM site go to your site and select Submit for compliance.
This link takes you to a wizard where you have a link to the compliance criteria and verification cases documents. The wizard has two pages. On the first page choose Yes in the drop down (if you meet the compliance requirements). Then click Next
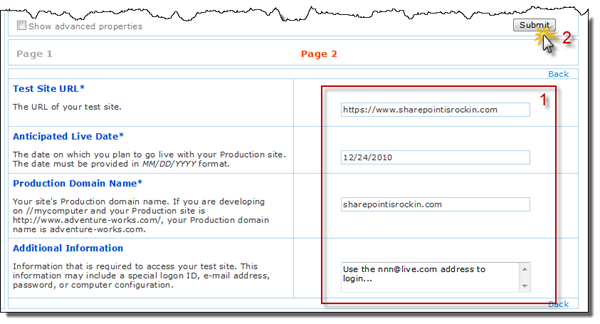
The second requires you to enter information about your site, test environment and anticipated launch date. You also have to option to write some notes to the tester. Once you have entered the information click Submit.
When you’re done you should see a message that the site is successfully submitted.
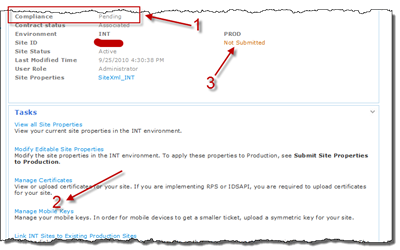
Now all you have to do is wait for a response from the tester. This can take anything between two days to two weeks. While you are waiting you can see the current status of your site in the MSM site. The image below shows that; (1) your site is pending, (2) you cannot longer submit it for compliance and (3) it is not yet submitted to production (this is the next step).
Compliance answer
You will receive answer after some time and it can either be negative or positive. I’ve actually had some problems at first - the tester did not see the standard (OOTB) Sign In link in SharePoint 2010 (probably due to the 115% zoom bug in SP2010). But once it was approved I received an email like this:
Submitting for production
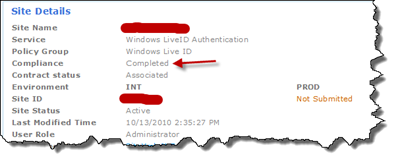
When you are approved but before you can use the site in the PROD environment you need to go back to the MSM site and submit the site into production. This is done on the manage site page. The Site Details will look like this before submitting to production.
To submit the site to the PROD environment choose the Submit Site Properties to Production link in the Tasks below the Site Details:
Once you have clicked that link you will be asked to specify the production environment details. The most important thing is to change the DNS Name. As said in part 1 you must use a URN instead of a URL. If you have a URN like this
urn:wictorslivesite:int
then create a URN looking like this for production:
urn:wictorslivesite:prod
.
When you are done click Submit and on the next page verify that all your properties are valid. Once you are ready click the Yes button to finalize the submission to the PROD environment.
The Site Details should look like this when everything is set and done.
Configuring the PROD site
Enough of fiddling in the MSM site - let’s take on SharePoint 2010 instead. These steps are pretty much the same as for when configuring the INT site - with the difference that we use another certificate, the new DNS Name, a new login URL and new accounts.
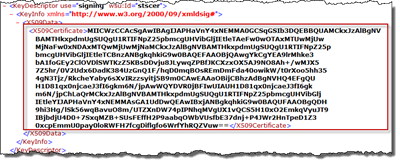
First you need to get the PROD certificate. Go to https://nexus.passport.com/federationmetadata2/2007-06/federationmetadata.xml and extract the signing certificate. Copy the inner text of the X509Certificate element into an empty Notepad document and save it as LiveID.cer.
Start a new MMC session and add the Certificates snap in. Import this certificate into the same three locations as you did with the INT certificate; Trusted Root Certificates, Trusted People and SharePoint. Make sure to do this on ALL WFE and application servers in your SharePoint farm.
Note that you do not need to remove the INT certificate if you are using the same farm/servers for PROD and INT.
Next is to fire up PowerShell and do basically the same procedure as for the INT site. The difference is highlighted in red below:
1: asnp microsoft.sharepoint.powershell
2: $realm = "urn:wictorslivesite:prod"
3: $certfile = "C:\Temp\LiveID.cer"
4: $rootcert = Get-PfxCertificate $certfile
5: New-SPTrustedRootAuthority "Live ID Root Authority" -Certificate $rootcert
6: $emailclaim = New-SPClaimTypeMapping     -IncomingClaimType "http://schemas.xmlsoap.org/claims/EmailAddress"     -IncomingClaimTypeDisplayName "http://schemas.xmlsoap.org/claims/EmailAddress"     -SameAsIncoming
7: $upnclaim =  New-SPClaimTypeMapping     -IncomingClaimType "http://schemas.xmlsoap.org/ws/2005/05/identity/claims/nameidentifier"     -IncomingClaimTypeDisplayName "UPN"     -LocalClaimType "http://schemas.xmlsoap.org/ws/2005/05/identity/claims/upn"
8: $authp = New-SPTrustedIdentityTokenIssuer -Name "LiveID"     -Description "LiveID" -Realm $realm -ImportTrustCertificate $certfile     -ClaimsMappings $emailclaim,$upnclaim -SignInUrl "https://login.live.com/login.srf"     -IdentifierClaim "http://schemas.xmlsoap.org/ws/2005/05/identity/claims/nameidentifier"
On line 2 you must use the PROD DNS Name/URN. On line 3 you need to use the newly created Live ID certificate On line 5 use a different name of the trusted root authority, compared to the INT site On line 8 when creating the trusted identity provider specify a different name (than the INT provider) and use the PROD Sign In Url.
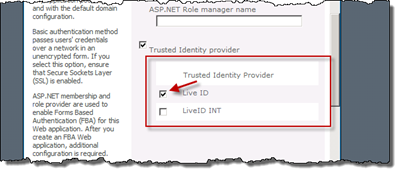
Then go to Central Administration on your site and select the Web Application that will use the Live ID. Configure the authentication providers to use the new trusted identity provider. If it is the same web application uncheck the INT provider before checking the PROD provider and save your edits.
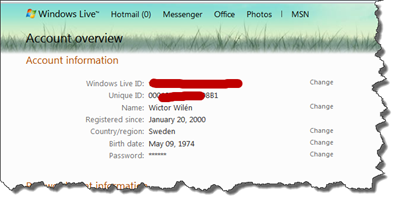
Only one thing more to do. The INT and PROD environments uses different Unique User Identifiers for the logins. If Live ID is your only authentication provider you need to configure a new site collection administrator for your site collections. You can find the Unique ID on the Live ID Account Overview page.
Use that ID and append @live.com and use that when configuring your site collection admins:
That’s it - you are now running your SharePoint 2010 site using Windows Live ID login! Use the same procedure as in part 2 to assign permissions to all users out there…
Summary
This also sums up this series on configuring SharePoint 2010 for usage with Windows Live ID. I hope that you enjoyed it and avoids falling into some of the traps that I did along the road. Possibly (but not guaranteed) I will have some follow-ups on this series with some more troubleshooting and interesting tidbits found on my journey!
Keep on SharePointing!
Oh, and if your in Singapore next week for the Southeast Asia SharePoint Conference just come by and say hello and I’ll give you some great discount on my SharePoint book - SharePoint 2010 Web Parts in Action.


