Introduction
SharePoint 2010 introduced the Service Application concept and that architecture model also includes the possibility to publish and consume service applications between farms. For instance you could have the Managed Metadata service application in one of your farms and use it in another farm. There are several interesting and valid scenarios for this and some of them include having dedicated Shared Services farms, that is a farm that’s only hosting service applications and not any content applications. If you have one of these farms, or farms that publishes or consumes service applications you are facing an interesting upgrade scenario when looking at SharePoint 2013. In this Visual Guide I’ll try to go through all the required steps for a successful upgrade to SharePoint 2013
Note: this is written for SharePoint 2013 Preview. Things might change over the next few months up until RTM. If I remember I’ll go back and revisit the post when RTM is due, if not, remind me.
SharePoint upgrade
As you perhaps know by now, there is no inplace upgrade in SharePoint 2013, which means that you have to do the database attach approach in a completely new SharePoint 2013 farm. If you’re still reading I assume that you have farms and service applications that are published and consumed, and you might start to get a slight headache now when you realize that you might have to synchronously create new farms and move all your databases. Well, don’t be sad – I have good news for you.
SharePoint 2013 allows it’s published service applications to be consumed by a SharePoint 2010 farm. This means that we can upgrade the farm that is hosting the service applications first! In a services farm case, it means that the services farm can be upgraded to SharePoint 2013 and then you can later upgrade the consuming farms, one at a time. This will save you lot’s of administration and testing and is just plain awesome! Of course this is not a recommended long-term scenario – you would like to get up on SharePoint 2013 with all your farms, but you can take one farm at a time which allows for better resource management and most likely you make it an easier decision for the ones owning the budget. So let’s get started…
Note: I’m not going to cover content application upgrade or upgrade of all service applications in this article, I’ll save that for later or for someone else…
Prerequisites and setup
In this guide I have a two farm setup; one farm with content applications and one farm with service applications. I will only use one service application – the Managed Metadata Service Application (which is the SA that is the best candidate for SA publishing). Beware of that not all service applications can be published and you cannot take advantage of the new 2013 Translation Service (which can be published) in a 2013 farm. Also you cannot take advantage of all the new features in the new service applications until you have fully upgraded the consuming farms to 2013.
In this guide I’m running SharePoint 2010 Service Pack 1 (December 2011 CU) in both my 2010 farms. I’ve not seen any specific requirements of version or CU level, if someone knows, please chime in. The farms in this case isn’t that spectacular it is single machines with Windows 2008 R2 and SQL 2008 R2 installed, but it sounds better with saying farm. They are all in the same domain, and the DC is located on its dedicated box.
The consuming farm machine is called SP2010A and has one content web application, with a Site Collection that has a Managed Metadata site column. The Managed Metadata is consumed from the other farm (machine name SP2010B).
Step 1: Set up a new Services Farm using SharePoint 2013
In order to start our upgrade path the first thing we need to do (except all the backup you normally do anyways, no?) is to set up a new parallel SharePoint 2013 farm. This farm is set up on a machine, called SP2013A, with SQL Server 2008 R2 and SQL Server 2012 SP1 CTP (going a little bit crazy here…). It’s a vanilla install, no farm configuration wizard or other voodoo. The 2013 farm has all the pre-requisites installed as well as the three KB articles KB2708075, KB2554876 and KB2472264. The installation of the 2013 farm was also done using the same accounts as used in the 2010 service farm.
Before proceeding I need to setup the publishing trust between the 2010 content farm and the 2013 services farm. This is done by exchanging certificates. Let’s start with exporting the certificates from the 2010 consuming farm:
asnp microsoft.sharepoint.powershell
$rootCert = (Get-SPCertificateAuthority).RootCertificate
$rootCert.Export("Cert") | Set-Content "C:\ConsumingFarmRoot.cer” -Encoding byte
$stsCert = (Get-SPSecurityTokenServiceConfig).LocalLoginProvider.SigningCertificate
$stsCert.Export("Cert") | Set-Content "C:\ConsumingFarmSTS.cer" -Encoding byte
 This creates two certificate files, copy those to the new 2013 services farm and import them like this:
asnp microsoft.sharepoint.powershell
$trustCert = Get-PfxCertificate C:\ConsumingFarmRoot.cer
New-SPTrustedRootAuthority "SP2010A" -Certificate $trustCert
$stsCert = Get-PfxCertificate c:\ConsumingFarmSTS.cer
New-SPTrustedServiceTokenIssuer "SP2010A-STS" -Certificate $stsCert
To verify that it worked fine, open up Central Administration on the 2013 farm and go to Security > Manage Trust, it should look something like this:

Next is to export the root certificate from the 2013 farm:
$rootCert = (Get-SPCertificateAuthority).RootCertificate
$rootCert.Export("Cert") | Set-Content "C:\PublishingFarmRoot.cer" -Encoding byte
Copy the file to the 2010 farm and import it like this:
$trustCert = Get-PfxCertificate C:\PublishingFarmRoot.cer
New-SPTrustedRootAuthority "SP2013A" -Certificate $trustCert
And verify it on the 2010 consuming farm:

Now we need to make sure that the consuming farm can query the Application Discovery and Load Balancing Service in the 2013 farm. This is done by using the Id of the consuming farm as identity. This is a Guid that you get like this (run the PowerShell on the 2010 farm!):
(Get-SPFarm).Id
In the 2013 farm go to Central Administration > Application Management > Service Applications and select the Application Discovery and Load Balancing Service. Then click on the Permissions button in the ribbon. Enter the Guid into the textbox and click Add, then give the remote farm Guid Full Control permissions and click OK, as in the picture below.
Now we are all set and done to proceed to the next step.
Note: as you just saw, the steps are exactly the same as on 2010.
Step 1b: The firewall (optional, but required)
If you have the/a firewall enabled you need to open up the required ports for Service Applications between the farms. This is a script that I find handy for that:
netsh advfirewall firewall add rule name="SharePoint 2010 Service Apps HTTP (TCP 32843)" dir=in action=allow protocol=TCP localport=32843 profile=domain
netsh advfirewall firewall add rule name="SharePoint 2010 Service Apps HTTPS (TCP 32844)" dir=in action=allow protocol=TCP localport=32844 profile=domain
Step 2: Set your Service Applications into read-only mode
Once you have your (now) three farms ready you have a couple of options, depending on which service applications your services farm host. For instance if you have the Search Service Application published you are a bit lucky. This is a service application where users do not edit/write data – they just read the index. So you can have your 2013 service farm and 2010 service farm running in parallel and testing the new one. In service applications such as Managed Metadata its another story. In this case end-users might tag information, they might add new terms etc. In order to not loose any data you need to make sure that the end-users can’t edit data in that service application.
In the case of managed metadata I do two things – first of all I remove all permissions for the end-users, so that they do not update/add any data. Secondly I set the database used by the managed metadata service application to read-only – to make sure that no edits are done. And third – I put up a notification about this service update on the Intranet a couple of weeks in advance :).
Note: The MMS service application has some issues with having it’s database in read-only mode and it logs warnings and errors to the trace log. In this case we don’t care about that – we just want to protect the data.
I set the database into read-only mode on the 2010 service farm to Read-Only by editing the properties of the database and under Options select Database Read-Only to true.
Step 3: Backup and restore Service Applications databases
From this time we need to know about timings, since the users cannot add new terms and stuff in the MMS database. For your production farms you should test and time this properly so you can inform your users about how long it’s going to take.
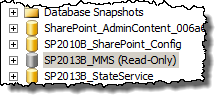
To move the database to the SQL Server on the new 2013 services farm I just do a backup and restore of the MMS database and then since we backed it up in Read-only mode I just flipped the switch back to normal mode.

As you can see in the picture, I restored it to a new name. This is my personal preference and a recommendation. In a few minutes it will be a 2013 database and no longer a 2010 one.
Step 4: Create new Service Application
The next step is to configure the 2013 service farm and to create a new MMS service application and do a database attach upgrade of the database we just copied.
Note: This part can (and probably should) be fully automated using PowerShell, but in this post it kinda contradicts the idea of a Visual Guide…
 First of I configure a service account to be used for the service application pools on the new service farm. In this case I use the exact same service accounts that I did in the 2010 service farm, to minimize the likelihood of errors. Once that is done I’m ready to create the new MMS service application.
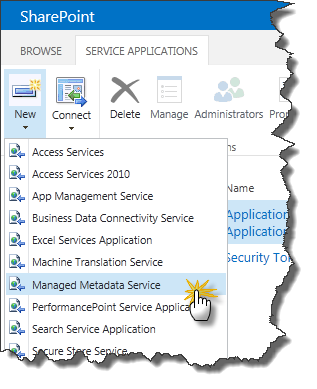
In Central Administration under Service Applications choose to create a new Managed Metadata Service.
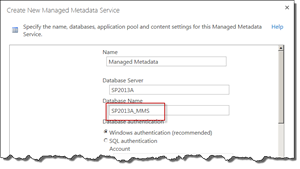
In the dialog that appears fill in the name of your new service application and in Database Name, enter the exact database name of the database you just restored to. That is, we’re pointing the new service application to an existing database. When we click OK, SharePoint 2013 is going to take care of the upgrade of that database.
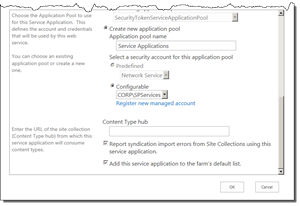
Next fill in to create a new application pool using the managed account you previously registered.
Once that is done, just click OK, and wait for the service application to be created and the database to be updated. When all is done you Service Application Page in the 2013 services farm should look like this:
Now, go ahead and start the service instance on the servers in your new services farm.
The service should now be up and running and all you have to do is to give permissions to the service application. In this case a good starting point is to configure the same permissions on the new 2013 MMS SA as you had on the 2010 one.
Step 5: Publish and Update the Service Application Connection
Now we are ready to start the publishing process of the new 2013 MMS SA. First of all we need to give the consuming farm permissions to use the service connection. This is done exactly the same as we did for the Application Discovery and Load Balancer Service Application. Use the Farm Id of the remote farm and give it permissions for the new MMS SA:
Time to hit Publish! Publishing of a service application hasn’t changed so the steps are the same as you did for your old 2010 service farm. First select the service application, then click Publish. Copy the hideous long Published URL into notepad (or remember it)
Click OK and wait for it to finalize its configuration.
Now it’s time to go back to the 2010 content farm. Navigate to Service Applications in Central Administration.
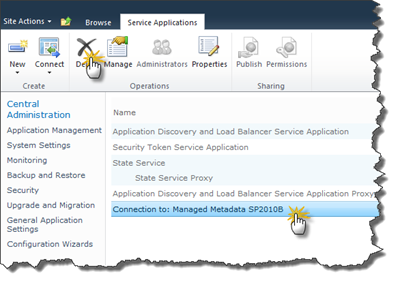
This is probably the most critical part of this whole upgrade. We are going to remove the old connection to the 2010 services farm. And once we click Delete, the end-users will be limited in what Managed Metadata features they can use. Don’t be worried though, it will only take a minute to get the new 2013 connection up and running.
So select the old 2010 connection and click Delete.
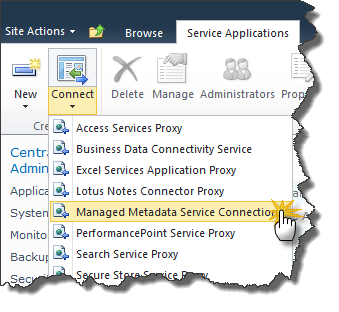
Now, let’s create a new Connection. Select Connect > Managed Metadata Service Connection
In the dialog paste (or enter) the Published URL that you got from the 2013 farm when published the MMS SA.
Click OK and wait for the 2010 farm to discover the remote 2013 MMS SA. It will take a couple of seconds. When it’s done, you are welcomed with a fantastic intuitive UI. You need to click on the Managed Metadata Service Connection, its background should turn into yellow. Then Click OK.
When prompted for the name of the Service Connection, either enter a vanity name or accept the suggested one. Click OK to finalize the connection.
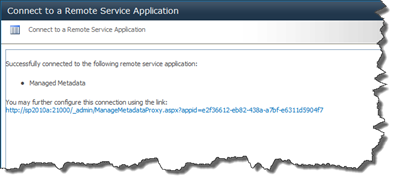
You should now be able to see your new Service Application Connection as well as the connection to the new remote Application Discovery SA.
Step 6: Test
All that is left now is to test if we got what we wanted.
First; in the new 2013 MMS SA enter a couple of new terms and let’s see if that is reflected on our 2010 farm.
Fire up the MMS management interface on the 2010 farm and see our newly created term. Looks like it is working!
In this view, note that we do not have all the new 2013 features, but you can clearly see the Term Groups from the 2013 MMS SA that is created for the new Search Service.
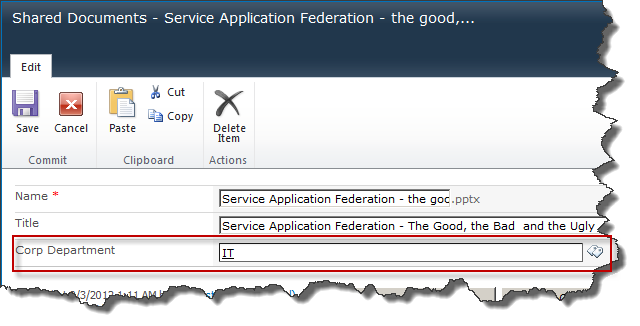
Then in the content web application, where I had a document library with a MMS column. Let’s edit document properties for a document there…
Yup, the new term is there as well.
Mission accomplished!
Step 7: Kill the old services farm
Next step is to decommission/kill/retire the old services farm and return the metal to the metal gods! Well, you need to make sure that you have upgraded all shared service applications before doing that. The procedure for the rest of the service applications are almost the same, but I’ll let you figure out the differences :)
Step 8: Upgrade the consuming farm(s)
Even though this works fine it’s not a long lasting situation, you would like to draw benefit of all the new 2013 features. So the final step in this upgrade scenario is to upgrade the content farm. Details for that is for another post.
Summary
I hope this bedtime story post gave you some insights in how to upgrade a shared services farm from SharePoint 2010 to SharePoint 2013. As you can see it’s a very smooth transition and upgrade. This whole scenario should also show you one of the benefits of having separate service farms, this allows you to make an upgrade easier and faster.


