This is the fifth post in the Visual guide to Azure Access Control Services authentication with SharePoint 2010 and this time it is time to augment some claims using the Azure ACS. We’ll do this to prepare for the next exciting part. For this post I assume you have configured at least one Web Application to use Facebook login using Azure ACS - make sure that you’ve followed post 1 and post 3 and optionally post 4 thoroughly.
Why augment custom claims?
Sometimes you need more information from the users than just the e-mail and name. Perhaps you would like to get the phone number, age or other stuff. If you have that data in your identity provider you can augment that information (claim) to SharePoint. With Azure ACS you only have a specific set of data, unless you use a custom Identity Provider in Azure, such as ADFS. The default Identity Providers (Live ID, Google ID, Yahoo and Facebook) in Azure only has a limited set of claims that is sent to SharePoint.
Using Azure ACS we can augment brand new claims - using the Rules editor in the Azure ACS management UI. You can create new output claims from scratch or new output claims based on values from the other input claims. In this scenario we’re going to create a completely custom claim called “Identity Source” which will identify from where the identity is coming (Facebook, Yahoo or Google). We will then be able to use this in SharePoint to target information.
If we log in to SharePoint using a Facebook account these are the claims that we get by default:
These claims are retrieved through a very simple Visual Web Part containing a DataGrid and the following code behind:
protected void Page_Load(object sender, EventArgs e) {
    IClaimsPrincipal principal = Page.User as IClaimsPrincipal;
    IClaimsIdentity identity = principal.Identity as IClaimsIdentity;
    var data = from claim in identity.Claims
        select new {
            Claim = claim.ClaimType,
            Value = claim.Value
        };
    GridView1.DataSource = data;
    GridView1.DataBind();
}
.csharpcode, .csharpcode pre { font-size: small; color: black; font-family: consolas, “Courier New”, courier, monospace; background-color: #ffffff; /*white-space: pre;*/ } .csharpcode pre { margin: 0em; } .csharpcode .rem { color: #008000; } .csharpcode .kwrd { color: #0000ff; } .csharpcode .str { color: #006080; } .csharpcode .op { color: #0000c0; } .csharpcode .preproc { color: #cc6633; } .csharpcode .asp { background-color: #ffff00; } .csharpcode .html { color: #800000; } .csharpcode .attr { color: #ff0000; } .csharpcode .alt { background-color: #f4f4f4; width: 100%; margin: 0em; } .csharpcode .lnum { color: #606060; }
Adding a custom claim in Azure ACS
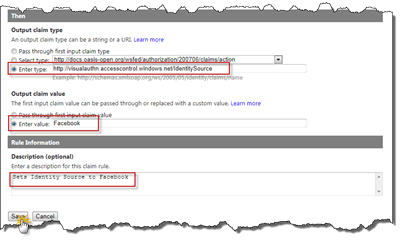
As usual we’ll begin with the configuration in Azure. We would like to create a new claim with the following name http://visualauthn.accesscontrol.windows.net/IdentitySource. It will have the value Facebook when logging in using a Facebook account and the value Google when logging in with Google Id.
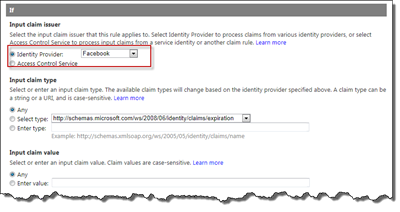
In Azure ACS go to Rule Groups and select the Rule Group that you use for your Relying Party Application. Click Add to create a new Rule. In the If section we choose Facebook as Input claim Issuer, and then for Input claim type select Any and leave Input claim value set to Any.
In the Then section enter our own Output claim type and use the name above. For Output claim value we enter Facebook, since that is the value we want SharePoint to receive for this claim. Finally always write a description on the rule - if you have many it can be a mess finding them otherwise. Once you’re done click Save.
Repeat the procedure for the Google IP. Add a new Rule with Google as Input claim issuer and the Output claim value set to “Google” - the rest should be the same as above. The Rule Group should look like this after these two operations:
Configure the SharePoint Trusted Identity Provider
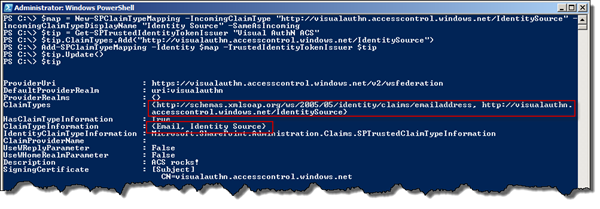
Now we need to configure the Trusted Identity Provider in SharePoint 2010 so that it accepts these incoming claims. And of course this is done in PowerShell. First we create a new claim mapping and then get a handle on our Trusted Identity Provider. After that we add our custom claim type to the trusted IP and finally add a claim mapping, before we persist the values.
$map = New-SPClaimTypeMapping -IncomingClaimType "http://visualauthn.accesscontrol.windows.net/IdentitySource" -IncomingClaimTypeDisplayName "Identity Source" -SameAsIncoming $tip = Get-SPTrustedIdentityTokenIssuer "Visual AuthN ACS" $tip.ClaimTypes.Add("http://visualauthn.accesscontrol.windows.net/IdentitySource") Add-SPClaimTypeMapping -Identity $map -TrustedIdentityTokenIssuer $tip $tip.Update()
That’s it - we should be ready to test it now…
Validate the the claims
If we log out and in again (this is required to get the new set of claims) we should see that our new claim is there and with the correct value.
If you have configured a separate web application and a secondary trusted identity provider, shown in the previous article, you will also see this claim - without modifying the secondary trusted IP. Cool huh!
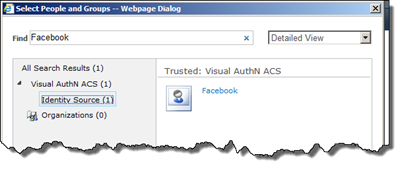
We can now use this claim to set permissions using the people picker:
Summary
I’ve now shown you how easy it is to augment claims using Azure ACS and to leverage them in SharePoint 2010. There are tons of cases where this is important and very useful. In the next post we’ll add another claim for Facebook users - which will allow us to do some really cool stuff.


