Back with another promised post in the Visual guide to Azure Access Controls Services authentication with SharePoint 2010. This time I’m going to show you how to work with multiple web applications. We’re going to use the stuff we configured in part 1 (basic setup) and part 3 (Facebook setup), and hopefully we’re avoiding the problems discussed in part 2 (common problems).
Scenario
In this article I would like to show you how to use Azure ACS and SharePoint 2010 when we have multiple Web Applications in SharePoint. The sample will assume the same web application as used in the previous posts, but now with a dedicated My Site Host Web Application (called http://my). If we just enable the same Trusted Identity Provider to the “My” Web Application, the user will be redirected to the Azure ACS log in page, but when he/she is redirected back it will redirect back to the other web application (called http://sp2010 in the previous posts), because that’s the web application we configured in the Return URL in Azure ACS.
Since this is a “visual” guide we’re only using the Azure ACS management web site to configure the ACS and the UI only supports one Return URL per Relying Party Application. If you’re using the ACS management web services you can configure multiple return url’s - but that’s another story for someone else to write about.
So, we actually need to create a new Relying Party Application in ACS to handle a different Return URL, and with that also another Trusted Identity Provider in SharePoint.
Create a new Azure Relying Party
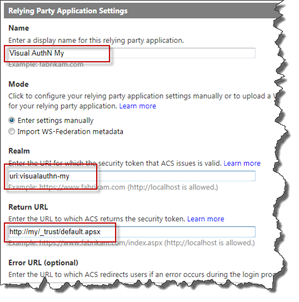
Let’s start with Azure ACS. Log in to the Azure management portal and go to Relying Party Applications, then choose to add a new one. Give it a Name (must be unique), a new Realm (must also be unique within the ACS namespace) and finally the new Return URL for our new web application.
The next parts are pretty trivial, but important. Make sure you choose SAML 1.1 as token format, increase the Token Lifetime (to the same value as your other/original RP), then choose the same Identity Providers as for your other RP. Do NOT create a new Rule Group, make sure to select the same Rule Group as your original Relying Party. This is to make it easier for us to manage (especially for upcoming posts). Leave the rest as is and click Save.
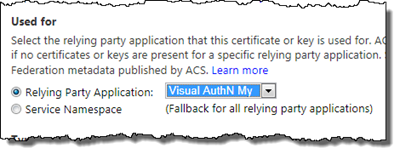
The next thing to do is to configure the Token Signing certificate for this guy. Click on Certificates and Keys and choose to add a new Token Signing certificate. Choose the newly created Relying Party Application in the drop down and then choose to upload the SAME certificate that you used for your original RP - this is important, no other certificate will do!
Hit Save once you’re done and we’re done with configuring our new Relying Party Application for the new SharePoint Web Application.
Create a new SharePoint Trusted Identity Provider
In SharePoint we need to add a new Trusted Identity Provider that uses the new Realm that was specified in the Relying Party Application. The procedure is basically the same as we did for our first Trusted IP, but with a subtle but important difference - we will not set the ImportTrustCertificate parameter in the cmdlet. We have already imported the certificate once, to the original trusted IP. Adding the same certificate to a new trusted IP will throw an exception. But this is good, you will shortly learn that. So use the following PowerShell to create the new trusted identity provider.
$realm = "uri:visualauthn-my" $signinurl = "https://visualauthn.accesscontrol.windows.net/v2/wsfederation” $map1 = New-SPClaimTypeMapping "http://schemas.xmlsoap.org/ws/2005/05/identity/claims/emailaddress" -IncomingClaimTypeDisplayName "Email" –SameAsIncoming New-SPTrustedIdentityTokenIssuer -Name "Visual AuthN ACS - MY" -Description "ACS rocks!" -Realm $realm -ClaimsMappings $map1 -SignInUrl $signinurl -IdentifierClaim $map1.InputClaimType
The important things here to notice is that we’re using the new Realm, the same sign in URL, gives the trusted ip a new Name and do not choose to use the ImportTrustCertificate parameter.
Now we’re ready to connect the web application to the new trusted identity provider.
Configure the secondary Web Application
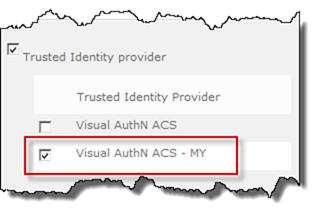
In Central Administration go to Web Applications Management, choose the new Web Application (in this case http://my ) and select the Authentication Providers button in the Ribbon. Choose the appropriate zone in the dialog and then scroll down to Trusted Identity Providers and select the newly created one.
Click Save when done and you’re ready to test it.
Test it
Now when you browse to the secondary web application you can log in using our new Azure ACS Relying Party Application and you will be redirected to the correct web application (and not back to the first one, which is the case if we used the original trusted IP for the secondary web application).
Now to the really interesting stuff! If you choose My Settings in both web applications you will notice that the account name is exactly the same.
This is good! This account will now be same throughout your web applications and you can actually set up a dedicated My Site Web App and have all Notes and Tags from the other web apps.
Even though we created a new trusted identity provider, the account name is exactly the same! Even the issuer is the same in this identity. The reason behind this is that since we did not add any signing certificate to the secondary trusted IP (and we don’t want to). When first trying to sign in SharePoint will redirect to the sign in URL (remember we have the same for both trusted IP’s) using the Realm for the web application. We’re using the same token signing certificate for both the ACS RP’s (and the same rule group, which means that we get the same set of claims back) and when SharePoint retrieves the incoming request from Azure ACS it will locate the trusted identity provider using that token signing certificate. And it will find our original trusted identity provider and use it’s settings (including claims mappings - which we’ll also see in subsequent posts). Smart huh!
The image below just shows our trusted IP’s and their certificates.
Summary
In this case we’re adding a new Relying Party Application and a new Trusted Identity Provider in SharePoint just to get a new Return URL. The Trusted IP is there to send the correct Realm to Azure ACS so that it sends back the request to the correct Return URL. And this is only what the new trusted IP is for - in follow up posts to this one we’ll modify the trusted IP and we only need to modify the original one to get effects on both web applications.
SharePoint is smarter than you think!


