A year and a half ago I posted the Visual guide to Windows Live ID authentication with SharePoint 2010 series, a post that got a tremendously amount of hits (and still gets) and tons of comments (and new ones still coming in). It showed quite a cumbersome way to Live ID enable your SharePoint 2010 Web Applications using the Microsoft Service Manager, MSM, (which works some times and some times not). Although it did/do work it is not the best way to enable Live ID authentication to your SharePoint 2010 web site. The MSM required you to first test in their INT environment and get approval before putting it into production, and you had to follow a set of guidelines on how to use Live ID logos etc etc, not mentioning all the manual configuration.
Microsoft has a service in its Windows Azure offering called Access Control Services. This is essentially an Identity Federation Provider, living in Windows Azure. This IP not only allows you to federate Live ID authentication but also Google ID, Facebook ID etc. In this post, and subsequent ones, I’ll do a visual guide on how to configure SharePoint 2010 to use Windows Azure Access Control Services, ACS, to handle your authentication.
Configuring Azure ACS
First of all let’s get acquainted with Windows Azure Access Control Services. But before you start you need to have a Windows Azure subscription. Unfortunately this isn’t for free, but if you have an MSDN Subscription you can take advantage of the MSDN Azure benefits. Once you have your subscription you head on over to http://windows.azure.com and sign in with your Live ID. Once you’re signed in you are in the Azure Management Portal.
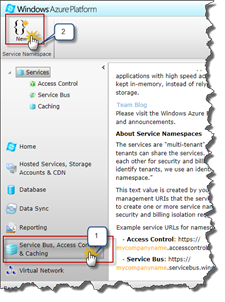
On the left hand side is the navigation and select Service Bus, Access Control & Caching (this is the part that was/is called Azure AppFabric), #1 in the image below. This will load all the AppFabric Services and you will get a new navigation tree on the left hand side and the Ribbon menu will update. To create your Service Namespace, which is like a “container” for the AppFabric services, click on the New button in the Ribbon (#2).
This will bring up a dialog where you create your new namespace. First of all select the services you want in this namespace - for this authentication sample we only need the Access Control (#1). Secondly you need to specify a unique namespace for your Service Namespace (#2). After that select an appropriate Region (#3) and optionally a Subscription if you have multiple ones. Once your satisfied click Create Namespace (#4) to start the creation.
The creation will take a couple of minutes, so now it’s a good time to take that coffee you all been waiting for! As always when dealing with AuthN, coffee breaks are good, that’s what my good ol’ buddy Spence always nagging about. Wait until the service namespace has the status of Active until proceeding further.
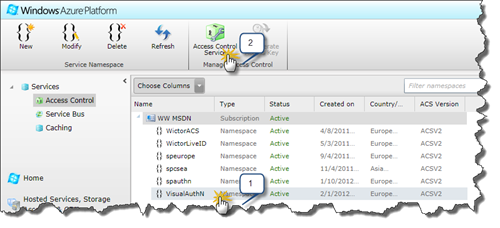
Once it has the Active Status, select your newly created Service Namespace (#1) and choose Access Control Service in the Ribbon menu (#2). This will open the Access Control Services administration. Note: you will navigate away from the Azure management and reuse the same browser window.
The Access Control Service administration site contains a lot of configuration options. You will see a left hand side navigation where you can set up everything from Identity Providers, IP, and Trusted Parties to custom certificates and get details on how to integrate this with your applications. The first thing we will do here is to add a couple of identity providers, click on Identity Providers in the menu.
Identity Providers
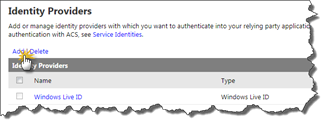
The Identity Providers menu option shows all the Identity Providers that currently is available for this ACS Service Namespace. By default you will only see Windows Live ID. While Windows Live ID might work (if you can live with all the guid based identities) it’s very convenient to add other IP’s here. Click on Add to add a new IP.
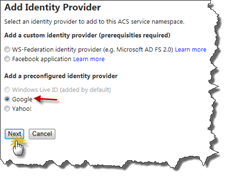
I like to add the Google Identity Provider, since all the user identities from Google IP will use the Google login id (e-mail). Select Google amongst the preconfigured IP’s and then click Next.
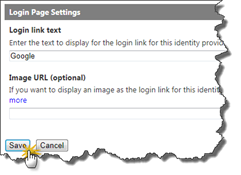
The next page gives you some customizations options for the Google IP. Change anything you want here and click Save to continue.
This should take you back to the IP page and you should now see both Windows Live ID and Google listed there.
The Relying Party
Next thing to do is to add a Relying Party Application, that is our SharePoint Web Application. Choose Relying party applications in the left hand menu. You will have no RP’s configured by default so click on Add to create a new one.
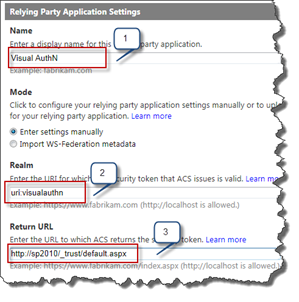
You will now see a form and it is here things must be written correctly otherwise you will not get the AuthN to work with SharePoint 2010. First of all give your RP a nice and easy name (#1). Secondly is the realm (#2), if you remember from the Live ID visual guide the Realm is important. Use a URI instead of URL, it’s easier to remember and always works. In this case I choose
uri:visualauthn
. Then we also need to fill in the Return URL (#3). The return URL must point to http://server/_trust/default.aspx when dealing with SharePoint 2010 (of course replace with your server name, localhost also works in a test environment).
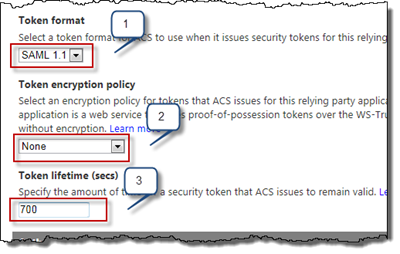
The next things to configure is the tokens. First of all SAML 1.1 must be used as Token Format (#1), SAML 2.0 is default in ACS so make sure to change this. Leave Token encryption policy to None (#2). Then finally an important piece - the Token lifetime. By default this is set to 600 seconds and you need to increase this value. The reason for that is that SharePoint 2010 has the expected token lifetime configured to 600 seconds and when SharePoint validates the token, which is after it’s been issued by ACS it will fall outside the lifetime. So you have two options here lower the SharePoint lifetime or increase it in ACS, in this case I’ve done the latter and set it to 700 seconds.
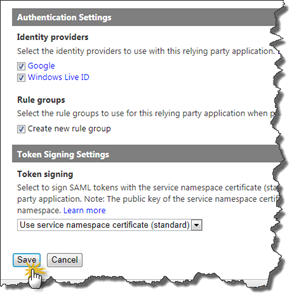
The rest of the configuration is left intact. If you like you can uncheck Windows Live ID if you do not want Live ID users to sign in with this RP. Click Save when you’re done.
You should now see your newly created Relying Party.
Some rules!
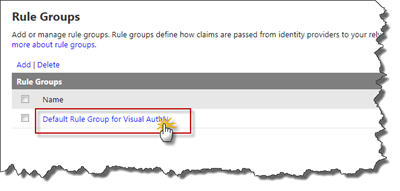
We now have two IP’s connected to the RP - each of the IP’s has a set of outgoing claims to our RP and we need to make sure that the claims received from the IP’s to the RP are passed through to SharePoint as outgoing claims from the RP. This is done through the Rule Groups. Select Rule groups in the left hand menu. You will see a Rule Group called “Default Rule Group for Visual AuthN” - this group was automatically created for us when we created the RP: Now click on the rule group to create the actual rules.
Note that there are no rules by default. To create the default rules, just click on Generate to create them.
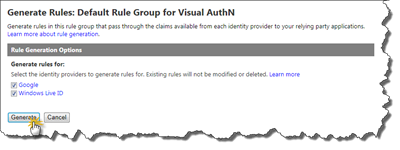
First we need to select for which IP’s to generate the rules, make sure both Live ID and Google (in this case) are selected and click the Generate button.
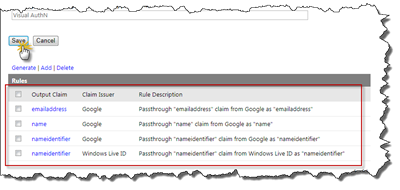
Now ACS will generate the default rules for all selected IP’s. Click Save to complete the rules setup.
I will in follow up posts on this one, show you how to fiddle a bit with these rules. But for now we’re just using all the default settings.
Certificates
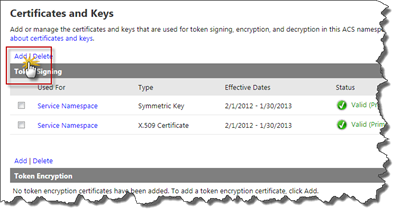
Next thing to do is to create a certificate that we will be using for Token Signing. The Management Portal makes it very easy for us to make a self signed certificate for testing and demo purposes. For production scenarios either purchase an X.509 certificate or request one from your local Certification Authority (CA) (for instance AD Certificate Services). Just make sure it’s a certificate for sign and encrypt the payload. Navigate to the Certificates and Keys in the ACS Management Portal. Click on Add next to the Token Signing certificates.
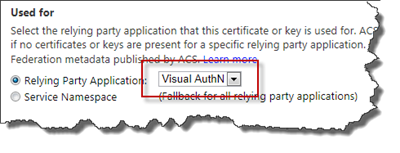
First of all make sure that the correct Relying Party is selected, it should be the one you just created. ACS allows you to have multiple RP’s so just make an extra check.
If you want to create a self signed certificate, take a look at the middle of that page. There is a small snippet that you just can copy and paste to create your own certificate (if you have the MakeCert utility, which is a part of the Windows SDK).
Copy and paste that into a command window or a PowerShell console. This will create your signing certificate and store in the My store on the box you run the command at.
Now you need to export this certificate into two files (with and without the private key). One to upload to ACS and one to import into SharePoint 2010 later. You can export the certificates using the Certificates MMC Snap-In (like in the previous visual Live ID guide) or use PowerShell, which will impress your colleagues more.
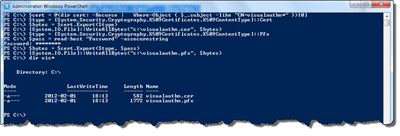
The PowerShell I use to export the certificate to one password protected Pfx file (with key) and a Cer file (without key) are the following:
$cert = @(dir cert: -Recurse |   Where-Object { $_.subject -like "CN=visualauthn*" })[0]
$type = [System.Security.Cryptography.X509Certificates.X509ContentType]::Cert
$bytes = $cert.Export($type) [System.IO.File]::WriteAllBytes("c:\visualauthn.cer", $bytes)
$type = [System.Security.Cryptography.X509Certificates.X509ContentType]::Pfx
$pass = read-host "Password" -assecurestring
$bytes = $cert.Export($type, $pass) [System.IO.File]::WriteAllBytes("c:\visualauthn.pfx", $bytes)
As you can see I grab the certificate with the correct subject and then use the .NET classes to export the certificates and finally save the bytes into files. Replace the exported filenames with your own and also the subject on the first line when doing this for your service,
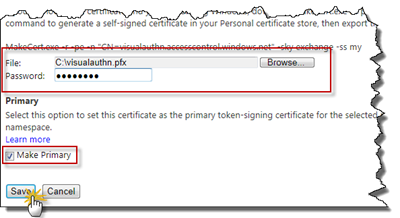
The Pfx file must be uploaded to ACS. You should still be on the Add Token Signing certificate page and now choose to upload the Pfx certificate and then enter the password you used when exporting it. Make sure that you choose to use this certificate as primary certificate and then click Save.
By now we’re done with ACS. Let’s head on over to configuring SharePoint.
Configuring SharePoint
Now it’s time for the fun stuff - SharePoint. First of all you need to have a Web Application that uses Claims Authentication. If your web app is in Classic mode, either create a new one or upgrade from Classic to Claims.
Trusted Root Authority
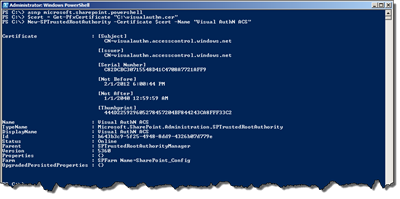
Now we need to make sure that the SharePoint farm trusts the certificate used by ACS to sign the tokens. This is done by uploading the other certificate file into SharePoint, using PowerShell. The following code is used to import the .cer file:
asnp microsoft.sharepoint.powershell $cert = Get-PfxCertificate "C:\visualauthn.cer" New-SPTrustedRootAuthority -Certificate $cert -Name "Visual AuthN ACS"
To verify that the certificate is imported as a trusted certificate in SharePoint, go to Central Administration > Security > Manage Trust. You should see the name of the trust there:
The Trusted Identity Provider
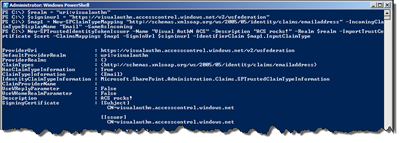
Next up is to add the ACS RP as a Trusted Token Issuer in SharePoint. Once again we’ll do this using PowerShell. Here it is really important that you specify the exact realm as entered when you created the RP in ACS (see line 1 in POSH below). Then you also need the Sign In URL for your RP. Modify line 2 below to match the URL for your Service Namespace (bold and red). Next we define a claim mapping for the identity claim that we want to use, in this case the e-mail address. Finally we just add the new trusted identity token issuer
$realm = "uri:visualauthn"
$signinurl = "https://visualauthn.accesscontrol.windows.net/v2/wsfederation”
$map1 = New-SPClaimTypeMapping     "http://schemas.xmlsoap.org/ws/2005/05/identity/claims/emailaddress"     -IncomingClaimTypeDisplayName "Email" –SameAsIncoming
New-SPTrustedIdentityTokenIssuer -Name "Visual AuthN ACS"     -Description "ACS rocks!"     -Realm $realm     -ImportTrustCertificate $cert     -ClaimsMappings $map1     -SignInUrl $signinurl     -IdentifierClaim $map1.InputClaimType
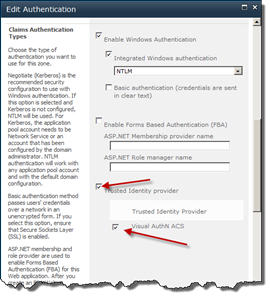
Now it’s time to modify our Web Application to use this ACS RP. Go to Central Administration and Web Application administration. Choose the Web Application you want to enable the RP for (remember that it has to be a Claims Web App). Choose to modify Authentication Providers from the Ribbon menu and select the correct Zone (normally Default). Then scroll down to Claims Authentication Types and check the Trusted Identity Provider checkbox and then our own ACS Trusted Identity Provider. Once that’s done click Save.
One final thing here before testing it all. I personally prefer to add a User Policy on the web application directly for one of the users that will log in through the ACS RP. You can of course log in using Windows AuthN and then set permissions inside the site if you prefer so. But this is how I do it. Select the web application and then click User Policy in the Ribbon. Then click Add User choose All Zones and enter the Google e-mail of the user that you will test with, give the user Full Control on the web application. Make sure that you type the e-mail correct - SharePoint will by default validate anything that you write in in Claims mode (more on this in another post).
With this policy in place all should be set to test drive it all.
Test it!
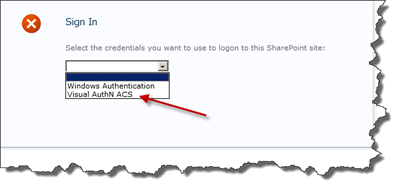
Now all we have to do is test it. Browse to the web application for which you added the Trusted Identity Provider, once it’s loaded you will be presented by the default multiple login page. The drop down will show all the available AuthN providers for the web application. To use the ACS login we only need to choose that provider in the list.
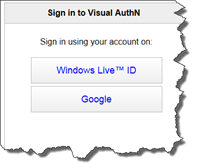
Once the provider is selected you will be redirected to the ACS RP login page. In this case we will see two possible providers to use - Live ID and Google. Click on the Google button and you will be redirected, once again…
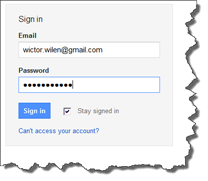
..this time to the Google log in page which will ask you for username and password. Enter the username (e-mail) that you used when creating the user policy for the web application and log in. In this case, with Google, Google will ask for confirmation that you trust the ACS RP. Choose Allow and you’ll be redirected back to the RP which will seamless redirect you to SharePoint.
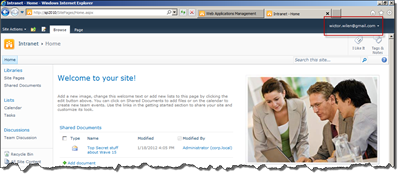
…and voila! You’re in! Take a look at the username in the upper right corner - it should be the e-mail address of the Google ID you used.
Summary
That was it - a visual guide on how to configure federated authentication using Windows Azure Access Control Services and SharePoint 2010. It is this easy! Even though this article was quite lengthy you can do it all in a couple of minutes (compare that to the way I previously showed)!


