I’ve been building chat-bots for a while now and I’m seeing more and more requests of building these bots for enterprises. For bots targeted at the enterprise, perhaps being hosted in Microsoft Teams, one of the first requirements is that they should get data from their internal systems and most specifically from Office 365, through the Microsoft Graph. The problem here is that we need to authenticate and authorize the user, through Microsoft Azure AD, to be able to access these resources. A Microsoft Bot Framework bot, does not inherit the credentials or security tickets from the application the bot is being invoked from, so we need handle this ourselves. For instance, even though you have logged in to Microsoft Teams, or Skype for Business or your Intranet – your security token cannot (and should not) be passed to the Bot.
This is not mission impossible, and there are multiple ways of implementing this. For instance if you’re building Bot Framework bots using .NET you can use the AuthBot and with node.js there’s the botauth module. There’s also other (a bit weird and specialized) ways of doing this by using the backchannel.
All of these are custom implementations with either sending an already existing access token to the bot or using home brewed magic number generators. But, there’s a much simpler way of doing this – using the native and built-in features of the Azure Active Directory Authentication Library (ADAL), specifically using the OAuth 2.0 Device Flow.
In this post I will demonstrate how to create a bot from scratch and use the device flow to sign in and get data from Microsoft Graph. It will all be built using node.js and TypeScript – but the procedure is the same for any kind of environment.
Creating the bot
First of all we need to create a bot using the Bot Framework portal. Give the bot a name, handle, description and specify the messaging endpoint. You can use localhost for testing but in the end you should have a publically available URL to be able to use it in the different Bot channels. In this sample we need to make sure that the messaging endpoint ends with
/api/messages
. Then you need to create a Microsoft App ID and a password – just follow the wizard and copy and take a note of the ID and specifically the password – you will only see it once. Once you’re done, save your bot.
Configuring the App platform for the bot
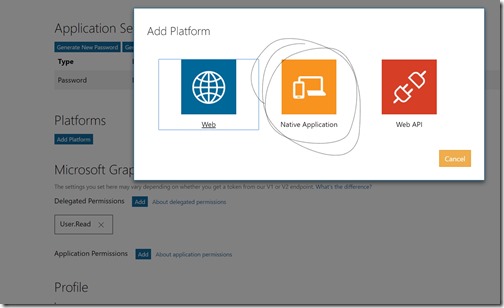
The bot created in the Bot Framework portal, is essentially an Application in the Microsoft Application Registration Portal. In order to use this Application ID with Azure AD and Microsoft Graph, we need to log in to that portal and find our newly registered bot and then add a platform for it. In this case let’s add a Native Application. You don’t have to configure it or anything, it just needs to have a platform.
In this portal you can also add the delegated permissions for your bot, under Microsoft Graph Permissions. For the purpose of this demo we only need the User.Read permissions.
Let’s write some code
Next step is to actually start writing some code. This will be done in node.js, using TypeScript and a set of node modules. The most important node modules used in this demo are:
-
webpack – bundles our TypeScript files
-
ts-loader – webpack plugin that transpiles TypeScript to JavaScript
-
express – node.js webserver for hosting our Bot end-point
-
adal-node – ADAL node.js implementation
-
@microsoft/microsoft-graph-client – a Microsoft Graph client
-
botbuilder – Bot Framework bot implementation
All code in this sample are found in this Github repo: https://github.com/wictorwilen/device-code-bot. To use it, just clone the repo, run npm install. Then to be able to run it locally or debug it you can add a file called .env and in that file add your Application ID and password as follows:
MICROSOFT_APP_ID=fa781336-3114-4aa2-932e-44fec5922cbd
MICROSOFT_APP_PASSWORD=SDA6asds7aasdSDd7
The hosting of the bot, using express, is defined in the /src/server.ts file. For this demo this file contains nothing specific, part from starting the implementation of the bot – which is defined in /src/devicecodebot.ts.
In the bot implementation you will find a constructor for the bot that creates two dialogs; the default dialog and a dialog for sign-ins. It will also initialize the ADAL cache.
constructor(connector: builder.ChatConnector) {
    this.Connector = connector;
    this.cache = new adal.MemoryCache()

    this.universalBot = new builder.UniversalBot(this.Connector);
    this.universalBot.dialog('/', this.defaultDialog);
    this.universalBot.dialog('/signin', this.signInDialog)
}
The implementation of the default dialog is very simple. It will just check if we have already logged in, but in this demo we will not set that value, so a login flow will always be started by starting the sign-in dialog.
The sign-in dialog will create a new ADAL AuthenticationContext and then use that context to acquire a user code.
var context = new AuthenticationContext('https://login.microsoftonline.com/common',
  null, this.cache);
    context.acquireUserCode('https://graph.microsoft.com',
      process.env.MICROSOFT_APP_ID, '',
      (err: any, response: adal.IUserCodeResponse) => {
        ...
});
The result from this operation (IUserCodeResponse) is an object with a set of values, where we in this case should pay attention to:
- userCode – the code to be used by the user for authentication
- message – a friendly message containing the verification url and the user code
- verificationUrl – the url where the end user should use the user code (always aka.ms/devicelogin)
We use this information to construct a Bot Builder Sign-In Card. And send it back to the user:
var dialog = new builder.SigninCard(session);
dialog.text(response.message);
dialog.button('Click here', response.verificationUrl);
var msg = new builder.Message();
msg.addAttachment(dialog);
session.send(msg);
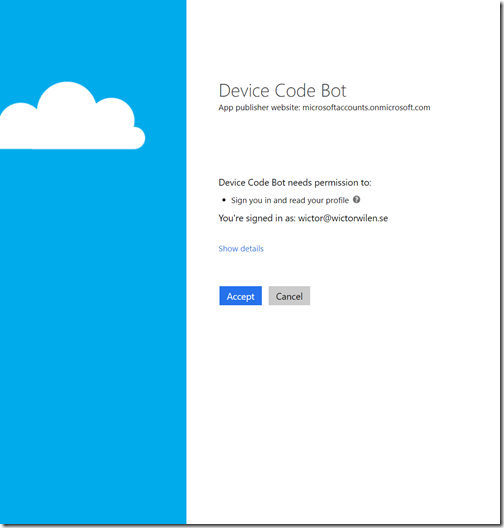
This allows us to from Bot Framework channel invoke the authorization flow for the bot. The end-user should click on the button, which opens a web browser (to aka.ms/devicelogin) and that page will ask for the user code. After the user entered the user code, the user will be asked to authenticate and if it is the first time also consent to the permissions asked for by the bot.
In our code we then need to wait for this authorization, authentication and consent to happen. That is done as follows:
context.acquireTokenWithDeviceCode('https://graph.microsoft.com',

process.env.MICROSOFT_APP_ID, response,
  (err: any, tokenResponse: adal.IDeviceCodeTokenResponse) => {
    if (err) {
      session.send(DeviceCodeBot.createErrorMessage(err));
      session.beginDialog('/signin')
    } else {
        session.userData.accessToken = tokenResponse.accessToken;
        session.send(`Hello ${tokenResponse.givenName} ${tokenResponse.familyName}`);
        ...
    }
});
The result from this operation can of course fail and we need to handle that, in this case just sending the error as a message and restart the sign-in flow. If successful we will get all the data we need to continue (IDeviceCodeTokenResponse) such as access-token, refresh-token, user-id, etc. In a real world scenario you should of course store the refresh token, in case the access token times out. And it is also here that we potentially tells our bot that the user is signed in redirects subsequent dialogs to what we want to do.
Now we can use this access token to grab some stuff from the Microsoft Graph. The following code, with a very simplistic approach, where wo do not handle timed out access tokens, we just grab the title of the user and sends it back to the user.
const graphClient = MicrosoftGraph.Client.init({
    authProvider: (done: any) => {
        done(null, session.userData.accessToken);
    }
});
graphClient.
    api('/me/jobTitle').
    version('beta').
    get((err: any, res: any) => {
        if (err) {
            session.send(DeviceCodeBot.createErrorMessage(err));
        } else {
            session.endDialog(`Oh, so you're a ${res.value}`);
        }
    });
    }
});
Run the application
To run the application first we need to transpile and bundle it using webpack like this:
npm run-script build
The we start the express server like this:
npm run-script run
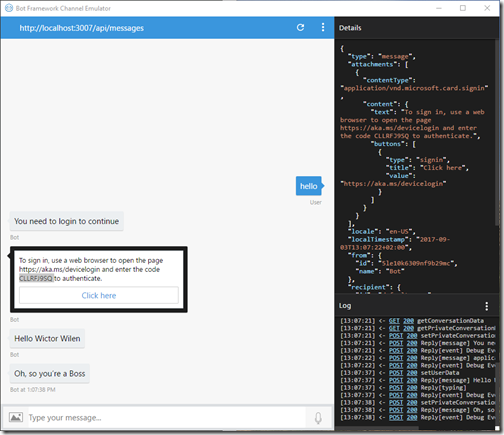
To test it locally we need to use the Bot Framework emulator. Download it, run it and configure it to run at http://localhost:3007/api/messages. Type anything in the emulator to start the sign-in experience
As soon as you’ve written something the Sign-In card will be displayed. When you click on the button a browser window will open and you will be asked to type the code. When you’ve done that you will be asked to sign-in and consent. And shortly after that the bot will come alive again and type the users name and if all works well, also the job title of the user.
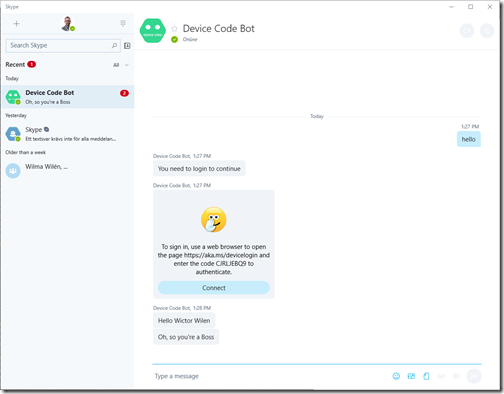
If you decide to publish your bot (for instance to Azure, all the necessary files are in the Github repo to Git publish it to Azure) you can also use the bot in other channels, for instance Skype:
Summary
As you’ve now seen. It is very easy to create a simple and elegant sign-in flow for your bots, without sacrificing any security, and all using standard features of ADAL and OAuth. This will nicely work with any Azure AD accounts, with MFA or not.


