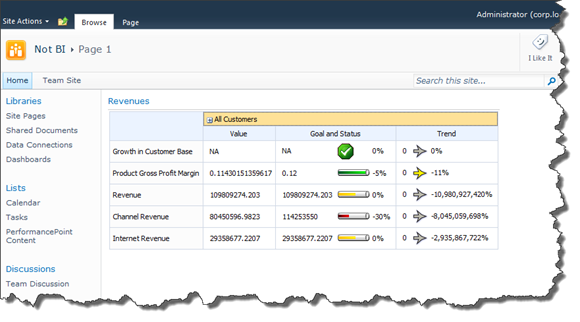
The other day I had an interesting and great workshop with a customer about the BI features in SharePoint 2010. SharePoint Insights is one thing that really gets me going - so much great stuff can be unleashed using Excel, Visio and PerformancePoint Services.
One thing that annoys me with the default settings in SharePoint 2010 is the BI Center. A BI Center does not support the “BI for everyone” mantra - that center only turns numbers and KPI fans on. What you should do is enable BI features on all of your sites; your Intranet home page, your department sites or even on project sites etc. But it isn’t as easy as you could imagine. So here’s some tips for you all to BI-enable all your sites. Oh wait, don’t say to your end-users that you BI-enabled their site - tell them that you have Insight enabled their site instead so you don’t scare them off.
Let’s start this little excursion by enabling the PerformancePoint features and Dashboard Designer on an new Site Collection with a top-level site based on a plain ol’ Team Site. Of course it is on a SharePoint 2010 Server with Enterprise features installed.
Enabling basic Insight features
First of all we need to make sure that the Enterprise features are enabled on your site. If not enable them on the Site Collection or enable them on all Site Collections from Central Administration under Upgrade and Migration.

Enabling BI-Center features
So what is so special about the BI-Center. It contains some demo pages using Excel Services, indicators and PerformancePoint content. But most interestingly it contains the special libraries and lists used by PerformancePoint Services to store the PerformancePoint data; the Data Connections Library, the PerformancePoint Content list and the Dashboards library. These lists and libraries cannot be created directly in the web interface, the definitions for these are “hidden” inside the BI-Center site definition. This can easily be solved using PowerShell or by creating our custom Insight enabler feature. PowerShell is great; but building a custom feature allows us to either staple it onto other site definitions or allow the end-user to turn the features on or off.
Let’s create a new feature that adds the necessary lists and libraries. Open Visual Studio and create a new Empty SharePoint Project and to that project we need to add a new feature, scoped to Web. The first thing we need to do is to enable two PerformancePoint features. Since these are hidden ones, activation dependencies is out of question. Let’s make it using a Feature Receiver. This feature receiver enables the PPSSiteMaster feature on the current web site and PPSSiteCollectionMaster feature on the Site Collection:
public const Guid PPSSiteMaster =
    new Guid("0b07a7f4-8bb8-4ec0-a31b-115732b9584d");
public const Guid PPSSiteCollectionMaster =
    new Guid("a1cb5b7f-e5e9-421b-915f-bf519b0760ef");
public override void FeatureActivated(SPFeatureReceiverProperties properties)
{
    SPWeb web = properties.Feature.Parent as SPWeb;
    SPSite site = web.Site;
    if (site.Features[PPSSiteCollectionMaster] == null) {
        site.Features.Add(PPSSiteCollectionMaster);
    }
    if (web.Features[PPSSiteMaster] == null) {
        web.Features.Add(PPSSiteMaster);
    }

}
In the FeatureDeactivated method, these features are removed as well. Of course you can add or check for any other features here that you would like to add, such as the Enterprise Features.
Next up is to create the libraries and lists. Just add a new Empty Element SPI to the project and the lists as follows:
<ListInstance Title="$Resources:ppsma,Onet_BICenter_Title"
              Description="$Resources:ppsma,Onet_BICenter_Description"
              TemplateType="450"
              Url="Lists/PerformancePoint Content"
              FeatureId="481333E1-A246-4d89-AFAB-D18C6FE344CE"
              QuickLaunchUrl="$Resources:core,lists_Folder;/PerformancePoint Content/AllItems.aspx"
              OnQuickLaunch="TRUE"/>
<ListInstance Title="$Resources:ppsma,Onet_BIDataConnections_Title"
              Description="$Resources:ppsma,Onet_BIDataConnections_Description"
              TemplateType="470"
              Url="Data Connections for PerformancePoint"
              FeatureId="26676156-91A0-49F7-87AA-37B1D5F0C4D0"
              OnQuickLaunch="TRUE"/>
<ListInstance Title="$Resources:ppsma,Onet_BIDashboards_Title"
              Description="$Resources:ppsma,Onet_BIDashboards_Description"
              TemplateType="480"
              Url="Dashboards"
              FeatureId="F979E4DC-1852-4F26-AB92-D1B2A190AFC9"
              OnQuickLaunch="TRUE"/>
 This CAML is almost a copy of what is in the BI Center site definition, with only modifications so that the correct elements and attributes are used (ListInstance instead of List etc).
Just hit F5 and watch it build and deploy beautifully. You can see the PerformancePoint lists and libraries in the Quick Launch. Also if you inspect the lists you can see that the correct content types are there.
Adding the Dashboard Designer
In order to utilize this fully we need to use the PerformancePoint Dashboard Designer. In the BI-Center template this application could be accessed through a button on one of the publishing pages that was added by default - not a nice solution.
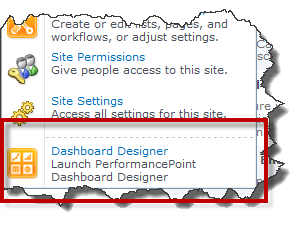
Instead we would like to have this one in the Site Actions menu, or any other suitable location. Site Actions is where I think it belongs. Let’s add it there.
Add a new Empty Element SPI and in that elements.xml add a CustomAction as follows:
<CustomAction Id="LaunchPPSDD"
              Location="Microsoft.SharePoint.StandardMenu"
              GroupId="SiteActions"
              Title="Dashboard Designer"
              Description="Launch PerformancePoint Dashboard Designer"
              ImageUrl="/_layouts/images/PPSSiteTemplateRun.png"
              >
  <UrlAction Url="javascript:
var a = _spPageContextInfo.siteServerRelativeUrl.toLowerCase();
var b = _spPageContextInfo.webServerRelativeUrl.toLowerCase();
var c = location.protocol + '//' + location.host + a;
var d = b.replace(a,'');
location.href = b + '/_layouts/ppswebparts/designerredirect.aspx' + '?SiteCollection=' + c + '&SiteLocation=' + d;"/>
</CustomAction>
.csharpcode, .csharpcode pre { font-size: small; color: black; font-family: consolas, “Courier New”, courier, monospace; background-color: #ffffff; /*white-space: pre;*/ } .csharpcode pre { margin: 0em; } .csharpcode .rem { color: #008000; } .csharpcode .kwrd { color: #0000ff; } .csharpcode .str { color: #006080; } .csharpcode .op { color: #0000c0; } .csharpcode .preproc { color: #cc6633; } .csharpcode .asp { background-color: #ffff00; } .csharpcode .html { color: #800000; } .csharpcode .attr { color: #ff0000; } .csharpcode .alt { background-color: #f4f4f4; width: 100%; margin: 0em; } .csharpcode .lnum { color: #606060; }
The CustomAction uses the default Dashboard Designer image and contains a UrlAction with a JavaScript. This JavaScript launches the Dashboard Designer with the correct Site Collection and Site.
Deploy your solution once again and create your dashboards - without the BI-Center.


