This is a follow-up post on yesterdays introduction to the WebPartAdder (which lately has been one of my favorite features of SharePoint 2010). In that post I mentioned that you could invoke a JavaScript function when a Web Part is added using a custom Web Part Gallery source.
The Silverlight Web Part
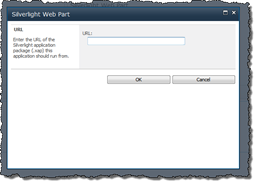
 If you have been working with SharePoint as an end-user you’ve probably seen the nice modal dialog that pops up when you’re adding a Silverlight Web Part to a page, see the image to the right. It allows you to very easily configure the Web Part with the appropriate XAP file without editing the Web Part properties. If more Web Parts were like this it would be a whole lot easier working with Web Parts.
The good news is that you can do this for your Web Parts - using a custom Gallery Source, just as I showed yesterday. And I’ll show you how.
Create a custom Web Part with a default Modal Dialog property form
In this sample we’re basically building out the same structure as I showed yesterday. I’ll show you a bit different approach though - which is a bit more compact. And we’ll need to throw in some custom JavaScript and an Application Page as well.
Create a new Visual Studio project
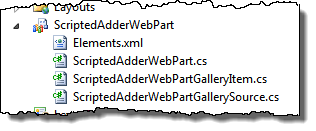
 First of all create a new empty SharePoint project in Visual Studio. Then add an Empty Element SPI, we’ll skip adding a Web Part like yesterdays post showed. In this Empty Element SPI add three files; one for the Web Part, one for the Gallery Source and one for the Gallery Item.
Make sure to change the Scope of the automatically added Feature to Site Collection, instead of the default Web value!
Implement the Web Part
We’re completely manually creating the Web Part in this case (my favorite way to do it :-). Add a simple string property (in this case called Data), a default constructor, another constructor that takes the property value as parameter and finally make the UI in the CreateChildControls() method. In order to get it to work you need to manually add a reference to System.Web. It should look something like this:
public class ScriptedAdderWebPart : WebPart {

    public ScriptedAdderWebPart() {
    }

    public ScriptedAdderWebPart(string data) {
        Data = data;
    }

    protected override void CreateChildControls() {
        this.Controls.Add(new LiteralControl(
            String.Format("You entered: {0}", this.Data)
            ));
        base.CreateChildControls();
    }

    [WebBrowsable]
    [Personalizable(PersonalizationScope.Shared)]
    public string Data { get; set; }
}
You also need to add the SafeControl entry for this Web Part on the SPI. Right-click the SPI and choose Properties. Click the ellipsis button on the Safe Controls row and click Add to add the Safe Control. Click OK when you’re done.
Create the custom Gallery Source
The custom Gallery Source is very simple, in this case we only want it to return a single custom Gallery Item. So the implementation should look as follows:
[Guid("f62379dd-8ec0-402e-8034-7a0bcaaf7a8a")]
public class ScriptedAdderWebPartGallerySource : WebPartGallerySourceBase {
    public ScriptedAdderWebPartGallerySource(Page page)
        : base(page) {
    }

    protected override WebPartGalleryItemBase[] GetItemsCore() {
        return new WebPartGalleryItemBase[] {
            new ScriptedAdderWebPartGalleryItem(this, base.Page)
        };
    }
}
Create the custom Gallery Item
It’s in the custom Gallery the magic happens, it’s where we tell the WebPartAdder to invoke a JavaScript before adding the Web Part to the page. The implementation is very similar to the one in yesterdays post, and I’ll only show you the differences. First of all we need to override the OnClientAdd property, it is a string and should contain the name of the JavaScript method that should be invoked.
public override string OnClientAdd {
    get {
        return "adderWithScriptDlg";
    }
}
Next we need to modify the Instantiate() method. We’ll create our custom Web Part using the constructor that takes the data as argument and pass in the value of the WebPartContent property. The WebPartContent property is a property of the Gallery Item that is set during the post back after your JavaScript has been invoked.
public override System.Web.UI.WebControls.WebParts.WebPart Instantiate() {
    return new ScriptedAdderWebPart(this.WebPartContent);
}
This property could basically contain anything, as long as it can be represented as a string. You can create JSON structures for instance if you need to pass more advanced data structures to your Web Part if you perhaps like to set several properties.
Create the custom JavaScript
Now it’s time to implement the JavaScript that is invoked when the end-user clicks the Add button to add a Web Part. Add the “Layouts” mapped folder to your project and add a new JavaScript file. In this file create a new function with the name you entered in the OnClientAdd property. It is important that it takes three arguments; item, zoneNum and zoneIndex. In this case we would like to open a Modal Dialog and retrieve the Web Part property value, so we implement it as follows:
function adderWithScriptDlg(item, zoneNum, zoneIndex) {
    var options = {
        url: SP.Utilities.Utility.getLayoutsPageUrl('Wictor.AdderWithScript/AddPage.aspx'),
        title: "Enter the data for the Web Part",
        width: 400,
        height: 300,
        dialogReturnValueCallback:
            Function.createDelegate(null, function (dialogResult, returnValue) {
            if (dialogResult == 1) {
                var wpVal = WPAdder._getHiddenField('wpVal');
                if (wpVal) {
                    wpVal.value = returnValue;
                }
                WPAdder.addItemToPage(item, zoneNum, zoneIndex);
            }
        })
    }
    SP.UI.ModalDialog.showModalDialog(options);
}
First of all we create the options variable that contains all the options for the Modal Dialog and then show the dialog using the showModalDialog() method. The properties for the modal dialog is configured so that It’s pointing to a custom Application Page (we’ll create that one in a moment). Then we set some other properties and finally the callback function of the dialog. In the callback we do something interesting - we retrieve a hidden field called wpVal and set the value of that field to the value returned from the modal dialog. It is this property that then is posted back to the WebPartAdder and inserted into the WebPartContent property. And then to actually add the Web Part we need to call back into the WebPartAdder JavaScript API (WPAdder) using the addItemToPage() method.
Create the custom Application Page
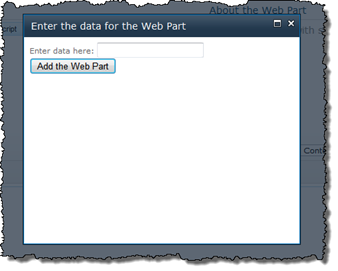
Now it’s time to create the custom Application Page. This is a standard procedure, so I’m not showing you all the details. But basically you add a new Application Page to the mapped Layouts folder and then create a UI. In this case a textbox and a button is sufficient. The server side code of the Application Page should handle the click of the button and return (using JavaScript) the value in the textbox to the callback method. This could be implemented as follows:
protected void btn_Click(object sender, EventArgs e) {
    Response.Clear();
    Response.Write(
        String.Format(
        "<script type='text/javascript'>window.frameElement.commonModalDialogClose(1,'{0}');</script>",
        data.Text
        ));
    Response.End();
}
It’s just closing the Dialog with an OK value (1) and then passing the value of the textbox as second argument.
And finally some CAML!
What would SharePoint development be without some CAML. We need to add our custom Gallery Source as a Web Part Adder extension and we need to make sure the JavaScript is loaded (for the sake of simplicity I add it to all pages). Modify the elements manifest of your SPI as below:
<Elements xmlns="http://schemas.microsoft.com/sharepoint/">
    <WebPartAdderExtension
        Assembly="$SharePoint.Project.AssemblyFullName$"
        Class="$SharePoint.Type.f62379dd-8ec0-402e-8034-7a0bcaaf7a8a.FullName$"/>

    <CustomAction
        Location="ScriptLink"
        ScriptSrc="~site/_layouts/Wictor.AdderWithScript/AdderWithScript.js" />

Elements>
First I use the WebPartAdderExtension to register the custom Gallery Source and then a CustomAction with Location set to ScriptLink to load the JavaScript.
Try it out!
Time to take this baby out for a spin. Deploy the solution and edit a page. When you choose to add a Web Part you should see something that looks like this, depending on what categories etc you set for your custom Gallery Item:
Now when you click Add you should, instead of seeing the Web Part on the page, see a Modal Dialog popping up.
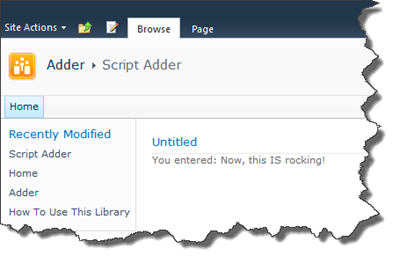
If you close the dialog without clicking the button your Web Part is not added, but if you write something in the text box and click the button the Web Part should be added to the page with the custom property set as specified in the dialog.
Summary
Once again the WebPartAdder has proven to be very useful for end-user scenarios where you want to make it easier for users to add and configure Web Parts. Not only can we dynamically populate the Web Part Gallery, we can also force users to specify configuration/information for the Web Parts. Happy devving!


