Writing this post has been on my agenda for some time, initially I intended to put it into my SharePoint 2010 Web Parts in Action book, but there was not enough time, you know how it is! This is an excellent new feature to SharePoint 2010 which allows you to dynamically populate the Web Part Gallery with Categories and Web Parts. So here we go.
Introduction to the Web Part Adder and the Web Part Gallery
Think of the List and Libraries category in the Web Part Gallery - it is dynamically populated with the lists and libraries available in the current web. This is all done using the WebPartAdder class which loads all the Web Parts available in the gallery from a number of different sources, see figure below. These source include the List and Libraries category, the local Web Part catalog, files in the wpcatalog, closed and uploaded Web Parts etc.

The really cool thing with this is that you can actually create custom Gallery Sources! This is a new feature of SharePoint 2010 and is really simple to do. I’ll show you how!
Create a custom Web Part Gallery Source
I’ve not yet seen any guide on how to create a custom Web Part Gallery Source, even though the classes and methods in MSDN are documented (the MSFT minimalistic way). To get this all working you need to use a new Feature element available in the Element manifest called WebPartAdderExtension. This element is referenced only once in MSDN, where it only says that the element is not documented!
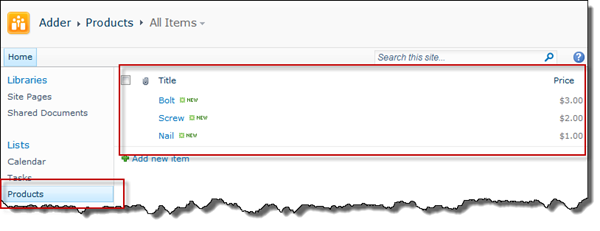
In this walkthrough I will use a very simple custom gallery source. It will dynamically populate the gallery with Product Web Parts that displays information about products. The product information is stored within a SharePoint list, in the local site, called Products.

From this list we’ll create a new category in the gallery that lists all products, and when a product is added to the page it should add a new Web Part displaying that particular product information.
Create a new SharePoint project
 Start by creating a new Empty SharePoint project. Make it a farm solution. Then add a new Web Part SPI - this will also add a Site Collection scoped feature to your project. In the Web Part SPI remove the .webpart file. We do not want to add this Web Part to the gallery - we only need the Web Part class. You can of course make the Web Part without an SPI if you want to.
Next step is to build the Web Part user interface - and here you can get fancy if you like. If you feel for a copy and paste excursion you can copy and paste the code below.
public class ProductWebPart : WebPart {
    public ProductWebPart() {
    }
    public ProductWebPart(SPListItem item) {
        ProductId = item.ID;
    }
    protected override void CreateChildControls() {
        SPList productList = SPContext.Current.Web.Lists.TryGetList("Products");
        if (productList != null) {
            try {
                SPListItem item = productList.GetItemById(ProductId);
                this.Title = "Product information:" + item.Title;
                this.Controls.Add(new LiteralControl(
                    String.Format("Product: {0} costs ${1}", item.Title, item["Price"])));
            }
            catch (ArgumentException) {
                this.Title = "Unknown product";
                this.Controls.Add(new LiteralControl("Product not found"));
            }
        }
    }

    [Personalizable(PersonalizationScope.Shared)]
    [WebBrowsable]
    public int ProductId { get; set; }
}
As you can see it’s a simple Web Part with one property ProductId that contains the id of the product to be listed. A specific constructor has been added which takes an SPListItem as argument - this one is used later by the custom source to instantiate the Web Part.
The CreateChildControls is very simple and just writes the name of the product and its price, if the product is found - otherwise it shows an error.
Create the Custom Web Part Gallery Source
Next is to create the Custom Web Part Gallery Source. First add a new Empty Element SPI to your project - the SPI will automatically be associated with the feature that was created by the Web Part SPI (unless you installed Waldeks fancy Visual Studio extensions :-).
In that SPI add two new classes; ProductsWebPartGallerySource and ProductsWebPartGalleryItem. The first one is the actual custom source and the second class represents the items in that source.
The ProdcutsWebPartGallerySource is responsible for discovering and iterating the items for custom gallery extension. This class must derive from the WebPartGallerySource and implement one constructor as well as one method as follows:
[Guid("01db1e81-5853-448e-b8c7-4b6564994ae3")]
public class ProductsWebPartGallerySource : WebPartGallerySourceBase {
    public ProductsWebPartGallerySource(Page page)
        : base(page) {
    }

    protected override WebPartGalleryItemBase[] GetItemsCore() {
        List<WebPartGalleryItemBase> items =
            new List<WebPartGalleryItemBase>();
        SPList list = SPContext.Current.Web.Lists["Products"];
        foreach (SPListItem item in list.Items) {
            items.Add(
                new ProductsWebPartGalleryItem(this, base.Page, item));
        }

        return items.ToArray();
    }

}
The required constructor required only passes on to its base class. The overridden GetItemsCore() method is the method that is responsible for returning all Web Parts discovered by this source. So in this case the method simply iterates over all available items in the Products list and creates a ProductsWebPartGalleryItem object. Also notice that I added the Guid attribute to the class - we’ll need that later.
Now it’s time to implement the gallery items. This is done in the second class file you created. The ProductsWebPartGalleryItem should be derived from the abstract class WebPartGalleryItemBase. It is implemented as follows:
public class ProductsWebPartGalleryItem : WebPartGalleryItemBase {

    private readonly string title;
    private readonly SPListItem item;

    public ProductsWebPartGalleryItem(WebPartGallerySource source, Page page, SPListItem item)
        : base(source, page) {
        this.item = item;
        this.title = item.Title;
    }

    public override System.Web.UI.WebControls.WebParts.WebPart Instantiate() {
        return new ProductWebPart.ProductWebPart(item);
    }

    public override string Category {
        get { return "Products"; }
    }

    public override string Description {
        get { return "Show listing for product: " + title; }
    }

    public override string IconUrl {
        get { return "/_layouts/Wictor.Adder/product.png"; }
    }

    public override string Id {
        get { return item.ID.ToString(); }
    }

    public override bool IsRecommended {
        get { return false; }
    }

    public override string Title {
        get { return title; }
    }
}
This implementation has one constructor, taking the source, the current page and the specific list item as arguments. It stores some values locally in the class and passes the source and page to its base class. Before discussing the Instantiate() method let’s take a look at the properties. These are the minimum properties required for the implementation to work, but there are several more that can be used to do some nifty stuff! Such as the ClientAdd method which allows you to specify a JavaScript method to execute when the Web Part is added or the RibbonCommand which allows you to execute a specific Ribbon command. What they do is pretty self explanatory! Interesting thing here is that you do not need to have the same category on all Web Parts in the source - you can populate several categories in the gallery, new or existing.
The Instantiate() method is responsible for creating the Web Part with the correct properties and is called by the WebPartAdder and the custom source when a Web Part is added to the page. In this case we create the Web Part using the custom constructor and pass in the list item.
So now all the code are done and it should compile fine. There is just one small thing left - the mysterious WebPartAdderExtension element. In your empty element SPI open the elements manifest file and make it look like the following:
Elements xmlns="http://schemas.microsoft.com/sharepoint/">
    <WebPartAdderExtension
        Assembly="$SharePoint.Project.AssemblyFullName$"
        Class="$SharePoint.Type.01db1e81-5853-448e-b8c7-4b6564994ae3.FullName$"/>
</Elements>
As attribute values I use the Visual Studio replaceable tokens for the assembly full name and for the full name of the custom Web Part Gallery source class - here’s the usefulness of the Guid attribute, no need to remember the class name and namespace and it allows for easier refactoring.
As a final icing on the cake I also added a sweet little image to be used in the gallery. Your solution should look like this:
Ok, we’re done!
Test the custom Web Part Gallery Source!
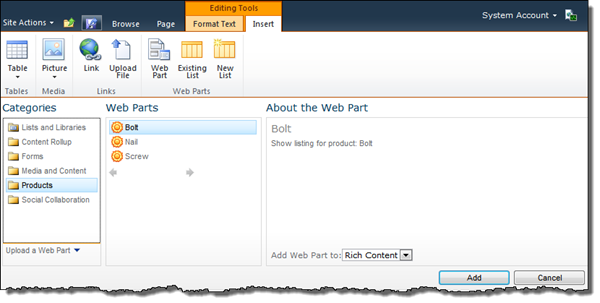
Now it is time to take this for a test drive. Deploy your solution, go to a page and edit it. Then click on Insert > Web Part. It should look something like this:
The items in the Product list ends up as Web Parts in the Products category, with the sweet little icon. You can now choose a Web Part and insert into the page and see how it renders the correct information!
Summary
You’ve now seen how you can extend the Web Part Gallery with custom Web Part Gallery Sources. It is fairly simple and it can be very useful if you want to help the users by creating pre-configured Web Parts. I can see really many good use cases of this. Oh, I forgot - this does not work in the Sandbox.


