Today an article was published on the SharePoint Developer Team Blog called Calling a WCF Service using jQuery. The content and purpose of the article is good and interesting but the way it is implemented can not be considered best practice and is definitely not the way we (I) teach SharePoint 2010 development. For instance this article manually registers assemblies in the Global Assembly Cache! Something that we never should do! It tells you to copy files to the virtual directory bin folder and into the Layouts folder! Ouch! Also, the article contains some plain ol’ errors.
Since the content of the article is relevant I will show you how to do it - the correct way. I’ll be using exactly the same code and sample but using the SharePoint 2010 Visual Studio templates and a WSP package to deploy the solution. So let’s get going doing it the correct way:
1) Create the Visual Studio 2010 project
Instead of splitting this up into several (non-SharePoint) projects we would like to make the whole solution deployable as a WSP file.
We start this by creating a new Visual Studio 2010 project by using the Empty SharePoint project template. The project must be deployed as a Farm solution, since we’re going to deploy stuff into the SharePoint Root.
2) Create the Data Access Layer
This is just as in the original article. Add a simple class to the project and implement the DAL. (You don’t need to have a backing database, just make some objects when testing this solution).
3) Create the WCF Service
 To create the WCF service we’ll do it in a different way, compared to the original article. Add a new WCF Service project item to the project and name it ProductService.cs. This will add three files to the project; IProductService.cs, ProductService.cs and app.config. You can safely remove the app.config, we don’t need it in this case.
Then implement IProductService.cs and ProductService.cs just as in the original article. Add references to Microsoft.SharePoint.Client.ServerRuntime.dll (found in GAC) and System.ServiceModel.Web.
The .svc file is added to the project by first adding a new SharePoint “Layouts” Mapped folder. Then add a simple text file project item to the layouts folder with the name ProductService.svc. We’ll come back to this one in a bit. First we need to make sure that we can use the Visual Studio 2010 replaceable tokens in svc files. Unload the project file and add a new PropertyGroup to the project file like this:

Load the project file once again and Visual Studio will during your next packaging parse the .svc files for replaceable tokens. Next go to the ProductService.cs file and add a Guid attribute to the ProductService class (don’t forget to add the namespace System.Runtime.InteropServices). The class should look like this:

Now head on over to the .svc file in the Layouts folder and edit the file so it contains the following (note that the code snippet below contains line breaks in the attributes which your code should not do):
<%@ ServiceHost Language="C#"
    Service="$SharePoint.Type.dc339fb8-7f69-4fdd-b2c6-d3586dfa6337.FullName$,
        $SharePoint.Project.AssemblyFullName$"
    Factory="Microsoft.SharePoint.Client.Services.MultipleBaseAddressWebServiceHostFactory,
        Microsoft.SharePoint.Client.ServerRuntime, Version=14.0.0.0, Culture=neutral,
        PublicKeyToken=71e9bce111e9429c"%>
As you can see the Service attribute consist of two replaceable tokens; the class name and the assembly full name.
Tip: If you think that there is to much manual configurations going on here then just download the latest release of CKS:Dev -it has a project item template for just this: WCF Service (CKSDev).
4) Create the JavaScript stuff
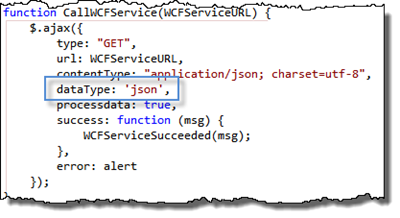
The JavaScript file which contains the custom JavaScript functions and classes should be added to the Layouts folder. And while your there add the jQuery JavaScript file as well. The JavaScript should look like in the original article, except that there is a typo in the CallWCFService() method. The call to the jQuery ajax method should have the dataType property set to “json”:

5) Add a Web Part to test it
The easiest way to test this solution is to add a Web Part to the project. Do that and implement the CreateChildControls method as follows:
protected override void CreateChildControls() {
    ScriptLink.Register(this.Page, "jquery-1.4.2.min.js", false);
    ScriptLink.Register(this.Page, "ProductsService.js", false);
    string url = SPContext.Current.Web.Url +
        this.ResolveUrl("~/_layouts/ProductService.svc/GetProducts");
    ScriptManager.RegisterStartupScript(this.Page, typeof(ProductsWebPart),
        "ShowMeHeaven",
        String.Format("CallWCFService('{0}')", url), true);
}
As you can see from the snippet above the jQuery and the custom JavaScript file is registered using the ScriptLink control and then we register a startup script which invokes the custom JavaScript method which calls the WCF service.
6) Test it
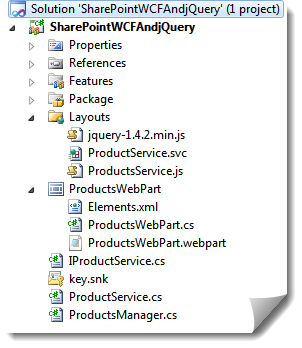
Your solution should now look like this:

Now, just go ahead click F5 and watch the solution deploy. Then add the Web Part to a page and see the alerts popping up with the data from the WCF service.
Summary
What I wanted to show with this article is a best practice approach to building SharePoint 2010 solutions by using WSP files and avoid all manual configuration of the SharePoint Root, virtual directories and GAC. If you do that you will end up with an inconsistent farm and you have to pay sooner or later for that, and it will cost!
Happy SharePointing!
