In SharePoint 2013 JavaScript is the new default language and all our (at least mine) solutions and projects are using JavaScript more and more, even though everything is not built as SharePoint Apps. Farm or Full-trust solutions built using JavaScript will in many situations create a better user interface and an improved perceived performance. The more we build user interfaces using JavaScript we cannot just forget about some of the basic UX rules, such as using localization. End-users really hate when they see mixed content in different languages. We’ve known for quite some time how to do localization server-side, but how do we do it in a smart way in JavaScript?
Localization in JavaScript
As always when it comes to cool stuff my mate Waldek Mastykarz already covered this topic pretty well in his post called “Globalizing JavaScript in SharePoint 2013”. In that blog post he shows how you actually can use a feature in SharePoint 2013 that allows you to get JavaScript objects, generated from RESX files, to localize the user interface. His guide pretty well covers everything you need, but I’m going to re-iterate some of it here anyways, and here is a sample on how to do it.
Assume that you have a resource file (RESX) in your solution in a SharePoint Mapped folder (to the Resources folder). By adding a script link to the ScriptResx.ashx HTTP Handler with the resource file name and the culture as parameters you can get all the resources as a JavaScript object. For instance a simple Hello World alert in a Visual Web Part could looks something like this.
First of all we need a resource file in the project (mapped to the Resources folder) and if you want localization, you of course have to translate it. This Resource file contains only one resource called HelloWorld.
To use this resource in JavaScript I have to write some code to load the ScriptResx.ashx HTTP Handler and pass in the name of the resource file and the name of the current culture.
SP.SOD.executeOrDelayUntilScriptLoaded(function () {
  SP.SOD.registerSod("demoresources",
    "/_layouts/15/ScriptResx.ashx?name=demoresources&culture=" +
    STSHtmlEncode(Strings.STS.L_CurrentUICulture_Name));

  SP.SOD.executeFunc("demoresources", 'Res', function () {
    alert(Res.helloWorld);
  });
}, "strings.js");
In the sample above I use the Script-On-Demand (SOD) JavaScript functions to first make sure that the Strings.js is properly loaded. I need that to get the name of the current culture (String.STS.L_CurrentUICulture_Name). Then I do a SOD registration and registers the script link for the ScriptResx.ashx file using the name of the RESX file and the name of the culture. Finally I wait for the SOD to load and then shows an alert using the Res.helloWorld object.
The ScriptResx.ashx file automatically creates a JavaScript object called Res and that object contains strings of all the resources in the RESX file. Note that the resources are using Camel Casing.
What is the problem with this approach?
This works fantastically great in most cases, and it is extremely hard to find anything on Waldeks posts that can be improved, but what if you don’t want to use the default namespace Res? It could be a matter of taste or a collision in names from different resource files. Fortunately there is a solution to this built into the ScriptResx.ashx HTTP Handler. You can actually specify two resheader elements in the Resource file to indicate that you want a custom namespace and the name of it – and this is exactly what SharePoint 2013 do for some of the built-in resource files.
<resheader name="scriptResx">
  <value>true</value>
</resheader>
<resheader name="classFullName">
  <value>SPResXDemo.Resources</value>
</resheader>
The resheader with the scriptResx name attribute tells the ScriptResx.ashx handler that we would like to generate vanity namespaces and the one with the classFullName name attribute tells the handler the namespace to use.
Unfortunately Visual Studio (not really, but the .NET ResXResourceWriter) does not handle this at all, as soon as you save your RESX file these two resheader elements will be removed. (And this is where I felt challenged!)
SPResX to the rescue!
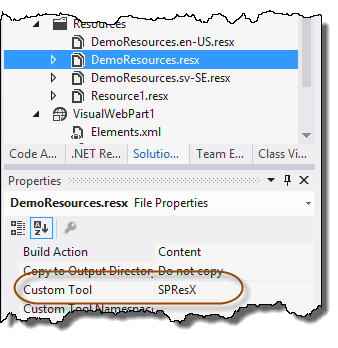
To handle this situation and to be able to use custom namespaces for my JavaScript localizations I’ve created a small tool called SPResX that replaces the default RESX Custom Tool, the ResXFileCodeGenerator, and correctly preserves the resheader attributes.
The SPResX tool can be downloaded from the Visual Studio Gallery and installed on any Visual Studio 2012 system, or found in the Extensions and updates in Visual Studio.
Once you have the tool installed you just need to change the Custom Tool to SPResX and save you Resource files. You need to do this on all resource files, including the different language and region variants. Now you will get a namespace that corresponds to your default project namespace. For instance if I have a project called Wictor.WebParts, the namespace will be Wictor.WebParts.Resources (since it is in the Resources folder). If you would like some namespace that is completely different, then you can just specify that namespace in the Custom Tool Namespace. (Yes, I know you will get a notification that the file has to be reloaded – that is just the way it is).
This is how the code from above can then be re-written using this tool, it works in the exactly same way but with a fancy vanity namespace of the resources.
SP.SOD.executeOrDelayUntilScriptLoaded(function () {
  SP.SOD.registerSod("demoresources",
    "/_layouts/15/ScriptResx.ashx?name=demoresources&culture=" +
    STSHtmlEncode(Strings.STS.L_CurrentUICulture_Name));

  SP.SOD.executeFunc("demoresources", 'SPResXDemo', function () {
    alert(SPResXDemo.Resources.helloWorld);
  });
}, "strings.js");
Summary
I hope this little tool will help somebody out there and I would appreciate feedback on it, either on this post or in the Visual Studio gallery.


